Edit Class Details
Realize administrators can edit class information directly in Realize. Select the Classes page in the top navigation menu. Then select the Manage Classes tab. District administrators see a list of all classes in the district, and school administrators see a list of all classes in their school. Follow the steps below to edit class names and rosters, remove a student from a class roster, and reset passwords.
It is important to coordinate class management with teachers. Some functionality is available in both Realize and the learning platforms. Changes can be overriden if two users are updating the same content.
Go to SavvasRealize.com and sign in as an administrator. Then follow the steps below to edit class details directly in Realize.
 Edit Class Name
Go to the Classes page, and use the filters to quickly find the class to edit.
- Select the Class Name. The Class Details page appears.
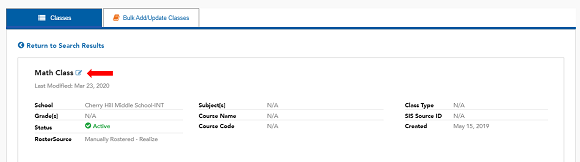
- Select the Edit icon to the right of the Class Name. The existing class name turns into an editable text box.
- Type the new class name.
- Select Save button to append the changes.
 Edit Class Roster
Administrators can add or remove existing students directly through Realize. Go to the Classes page. Use the filters to quickly locate the class that needs roster updates.
Note that students are automatically added to and removed from class rosters. Generally, you won't need to manually add or remove students, but there are occasions when you may still need to. The steps below explain how to add or remove students.
There are also times that a teacher needs to add or remove students manually. For information about that, see Add Students to a Realize Class and Remove Students from a Realize Class.
- Select the name of the class to update. The class details page appears.
- Scroll to the Students section.
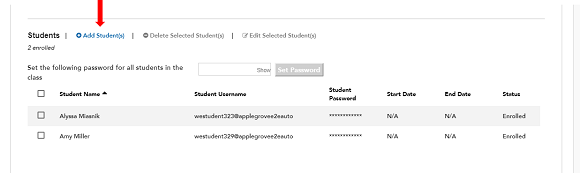
- Select Add Student(s).
- Begin typing the student’s last name in the text box that appears. Select the student to add to the class when the name automatically appears. The administrator can only add students to the class if they have already been uploaded to Realize.
- Save changes.
 Remove an existing student from a class roster
Note that students are automatically added to and removed from class rosters. Generally, you won't need to manually add or remove students, but there are occasions when you may still need to. The steps below explain how to remove students.
There are also times that a teacher needs to add or remove students manually. For information about that, see Add Students to a Realize Class and Remove Students from a Realize Class.
- Select the name of the class to update. The class details page appears.
- Scroll to the Students section.
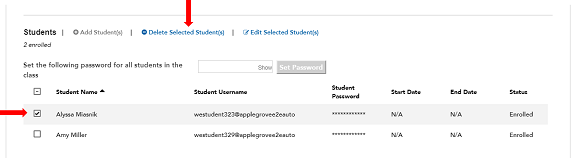
- Select the box to the left of the student(s) to remove from the class roster.
- Select Delete Selected Student(s).
- Select Confirm.
 Reset a Class Password
Administrators can create or reset a password for the entire class through Realize. Password changes are immediate and apply to all K12 learning platforms used by the student. Go to the Classes page, Manage Classes tab.
Follow the steps below to reset a class password:
- Select the name of the class to update. The class details page appears.
- Scroll to the Students section.
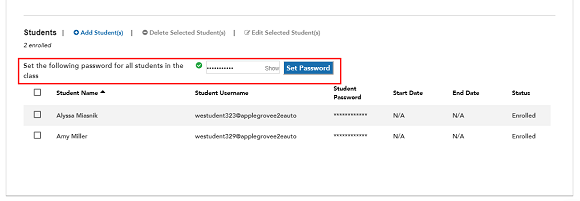
- Select the box to the right of the text Set the following password for all students in the class.
- Begin typing the new class password. The blue Set Password button enables when entered a unique, secure password using the following criteria; case-sensitive, eight or more characters with at least one letter and one number or special character, no spaces.
- Do not make the password the same as the student’s first, last, or username.
- For the password to not to display on the screen, check the box Hide password text.
- Select Set Password.
It is best practice for optimal security for each user to change their passwords to something they can easily remember after the class password has been reset.
Reset Username and/or Password for Individual Students
Administrators can also reset an individual student’s username and password through the Realize Edit class roster feature.
Follow the steps below after navigating to the Classes page, Manage Classes tab:
- Select the name of the class to update. The class details page appears.
- Scroll to the Students section.
-
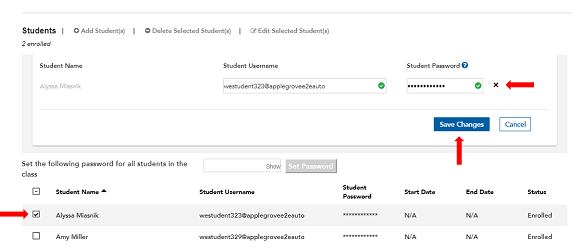
Check the box to the left of the student name.
- Select Edit Selected Student(s).
- Update the username and/or the password boxes next to the student’s name.
- Select Save Changes.
It is important to be aware that changing a student’s username and/or password changes it for all active classes in which a student is enrolled. Changes are immediately updated.
 Class Details New Year Rollover Setting
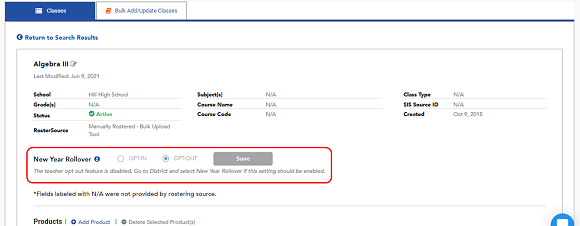
District administrators can override a teacher's new year rollover setting by changing the status on the class details page. If the teacher opt-out feature is enabled, administrators can change the radio button to OPT-IN or OPT-OUT.
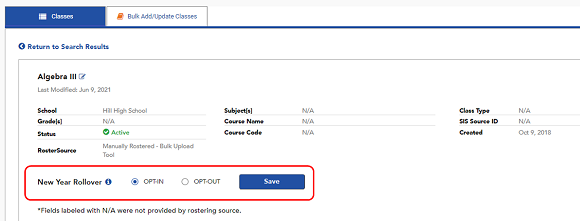
If the teacher opt-out feature is disabled, administrators see the new year rollover status grayed out. Administrators can still change the opt-out status for the class, but need to enable the teacher opt-in feature on the District Page/New Year Rollover.